

Do you want your metal roof to leak? Screwing or fastening down a metal roof is one of the easiest parts of a metal roofing installation, but it's also the most problematic. The main cause of a leaking roof on a “DIY” metal roofing installation is incorrectly fastening the screws. Your roof will have thousands of screw holes. Quite often, the screws are over- tightened or under-tightened and when this happens it creates leak points.
This can all be confusing to someone that has never installed a corrugated metal roof. There are lap screws, metal to wood screws, metal to metal screws, sealing tape, and you need to know the spacing of the screws. So, to make things easier we created a downloadable screw placement guide.
At Western States Metal Roofing we talk to thousands of customers each month. Our customers frequently ask us how to install metal roofing panels. The first step is understanding how to fasten you metal roof the right way. Fastening the screws correctly on your corrugated metal roof could be the difference between a roof that is weather tight or one that leaks. This article will guide you through the process of attaching your corrugated metal roof.
Our goal in this article is to explain:
- The correct method of tightening the screw
- Do not install the screws sideways
- Remove Metal Shavings
- Pre-drilling screw holes
- Using the correct tools
- Chalk lines
If you enjoy this article then we recommend that you read:
Screwing Metal Roofing. Correct & Incorrect Way Of Fastening A Metal Roof
How To Fasten Screws On A Metal Roof
Avoid Improperly Tightened Metal Roofing Screws or Fasteners
It is important to drive or install the screws correctly. This is a really simple procedure, but quite often it is done incorrectly. If you mess this up your roof will leak, so taking the time to correctly fasten the screws is exceptionally important. This video will be an excellent guide that will clearly demonstrate the correct way to tighten a screw.
The screws that you will be using will have a rubber washer with a metal cap. The rubber washer is just a bit smaller than the metal cap. You want to tighten the washer so that it spreads to the edge of the metal cap and not past the metal cap. When you tighten the screw it’s critical that you don’t drive it too far.

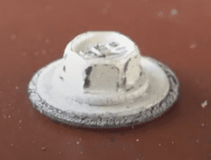 It’s a natural reaction to exert too much pressure and tighten the screw as much as possible. This will over compress the washer by expanding it too much and breaking the washer. If this happens back out the screw to relieve some of the pressure. If you over-tighten the screws then they might leak and will also need maintenance sooner.
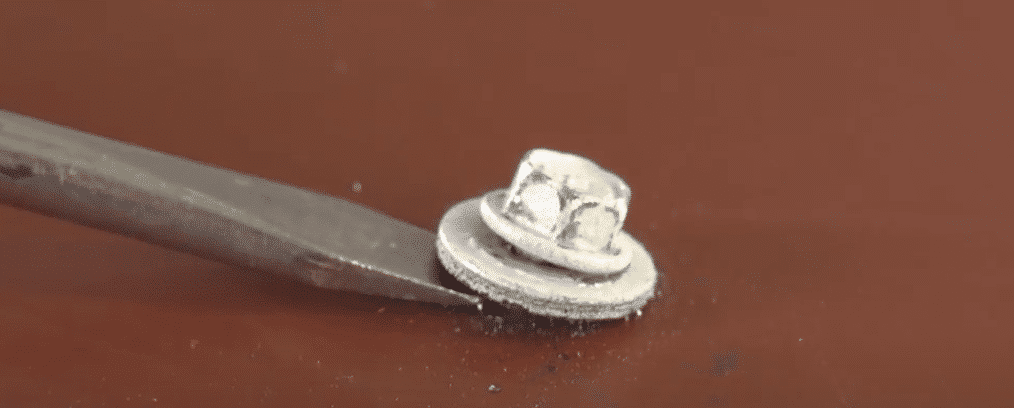
Conversely, it is common to under-tighten the screw. The easiest way to determine if the screw is too loose is to see if 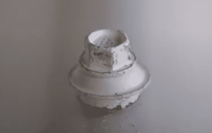 you can spin the washer. If the washer spins, then the screw is too loose and should be re-tightened. You will develop a feel for fastening the metal panels correctly, but just pay close attention to ensure that the screws are installed correctly.

Screws Should Be Installed Straight And Not Sideways
Screws that are installed sideways or tilted will not permit the rubber washer to seal correctly. This will create a possible leak point. If you notice this has happened then back the screw out and redo so that the screw is straight.
Corrugated Roof Flashings
If you're reading an article about fastening metal roofing and siding then there's an excellent chance you'll need help with trim and corrugated flashing for a metal roof. Check out our easy to navigate Metal Roofing Learning Center . There are step by step corrugated metal roofing installation videos for all of the metal flashing conditions of your job.

How To Remove Metal Shavings From The Roof
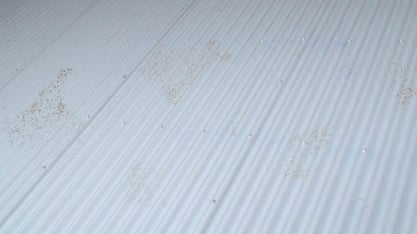 Swarf is the metal shavings and chips that are caused by cutting and drilling roof panels. These fragments tend to rust quickly if they are not removed from the roof in a timely manner. Leaving swarf on the panels after drilling will cause red corrosion spots to form and permanently stain the roof. This can and does happen—even overnight.
Swarf Removal
Brush or broom clean the swarf from with a soft-bristled brush to remove all of the metal shavings before they rust!
Do I Need To Pre-Drill Screw Holes For My Metal Roofing Panels?
If you asked two installers whether they pre-drill metal roofing sheets prior to installation, you would likely get two completely different answers. The screws that are used to attach the metal roofing are self drilling screws. This means that the screw will drill its own hole through the metal roofing panel and into the metal or wood substrate.
Therefore, you do not need to pre-drill the holes. In addition, if the metal roofing panel is being installed over metal purlins the spacing of the purlins might make it tricky to pre drill the sheeting in advance. You would have to measure the roof and drill the screw holes in the locations of the metal purlins. However, there are conditions in which pre-drilling the screws could make sense and save time.
You should consider pre-drilling the sheeting if you are attaching to a solid wood substrate. If the metal roofing panels are being installed over a solid wood substrate then you do not need to worry about the distance between supports. There is wood across your entire roof so anywhere that you drill a hole there will be a place where a screw can attach the panel.
If you decide to pre-drill the metal sheeting, stack as many panels as you can while allowing the drill to reach all of the sheets without drilling at an angle. The amount of sheets varies depending upon the panel profile. Use a clamp to ensure the sheets don't move and remain square.
What Are The Three Main Advantages Of Pre-Drilling Metal Roofing?
- Lessens the likelihood of the screws being installed at an angle because the pre-drilled hole will help guide the screw into the substrate. This is especially true with screws that are two inch and longer. It is just tricky to install a long self tapping screw without having the holes pre drilled. Longer screws have a much higher chance of being installed at an angle.
- Straight screw lines at perfectly spaced intervals. You will have the ability to run a chalk line at measured intervals. This keeps your screw lines straight and spaced out correctly.
- Time savings are created as you only have to string one chalk line. Since the sheets are stacked many holes are drilled at once. In addition, you only have to clean off the chalk line once, which surprisingly is more time consuming then you would think. The time savings are even more significant on screws that are two inch or longer. Longer self tapping screws are more difficult to install and it takes longer when compared to shorter screws.
Why You Should Use A Screw Gun To Fasten Metal Roofing Fasteners
Using the right tools is an essential step to prevent maintenance issues and roof failures. You must fit the tool to the fastener. You need an actual screw gun and not a drill or an impact driver. When you use a drill and let go of the trigger it does not disengage. You have to release the trigger at the correct moment or the screws will be over driven, damaging the washers and possibly the panels. Using an Impact gun to fasten screws is the single biggest cause of screw failures.
In addition, you can under-drive the fasteners which will create a leak point. A drill or an impact gun could work, but unless you have a lot of experience you are likely to incorrectly tighten the fastener. Using a real screw gun such as the Dewalt DW266, DW267, DW268 or the Milwaukee 6780-20 and 6790-20 lessens this possibility.
What Type Of Screw Gun Should I Use To Fasten Metal Roofing Panels?
Use an actual screw gun with an adjustable clutch and a depth sensing control feature. Screw guns are designed so that you can adjust the torque which will help eliminate over tightening of the screws. In addition, use a variable speed screw gun which will permit you to change the speed.
If you're a homeowner and it's just too expensive to purchase a screw gun for a one time installation there is a solid second option. A variable speed and adjustable driver will still get the job done and you may even already own one of these.
What Are The Correct Drill Speed Setting To Install A Metal Roof?
When you decide to screw down a metal roof it's important that you have the screw gun set to the correct drill speed settings. Always match the speed of the drill to the substrate or screw type.
- Use a 2,500 RPM screw gun for wood and steel substrates that are less than 1/4-inch thick
- Use a 2,000 RPM screw gun for steel substrates that are 1/4-inch thick and heavier
- Use a 1,000 RPM to 2,000 RPM screw gun for 304 stainless steel screws
Chalk Lines
A chalk line will keep your screw lines straight and spaced at the correct intervals. In addition, if you are installing the metal roofing over metal purlins it will insure that you fasten the screw in the center of the purlin. If you were to miss the purlin you would end up with holes in the metal panel.
Using the correct color chalk and cleaning it off of the metal panels is an important step that most people overlook. I sell metal metal roofing panels every day and I only just realized that using red chalk and then not wiping it off immediately after installation is problematic. I thought that the rain would remove it naturally and in most instances I was wrong.
The chalk lines should be removed after the panels are installed with a rag or cloth. Our goal is to sell you a beautiful roof and the last thing that we want is to sell you a gorgeous roof and three months later it has red chalk on it.
Here are some tips:
- Do not use red chalk. The chalk will be difficult to clean off of the metal roofing panels especially if you have a light colored roof
- Use a blue or white colored chalk
- Wipe off with a rag after the installation. Trying to wash the chalk off will not work as well as wiping it down with a rag.
Watch Our YouTube Channel To See Videos About Installing Metal Roofing
Installing a metal roof can be simple with the right knowledge and resources.. If you watch the videos in this blog you will not have any problems. If you are learning about fastening metal roofing panels then the next step is to learn about trim and flashing. A great starting point is to view our install guides or visit our YouTube Channel
Metal Roofing Install Guides
Discover which type of metal roofing fastener is right for your roof installation by reading:
Choosing The Right Screw For Your Metal Panels
Here is an additional article that discusses fastening metal panels:
Screwing Metal Roofing. Correct & Incorrect Way Of Fastening A Metal Roof