HOMEOWNERS: 750 sq. ft. minimum to receive a quote or sample.
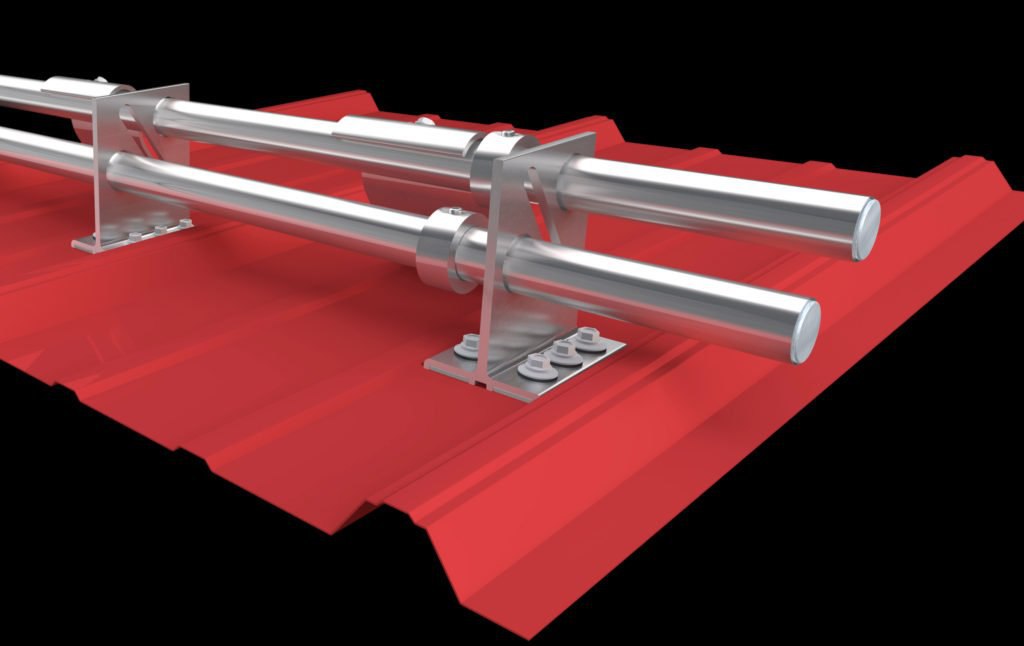
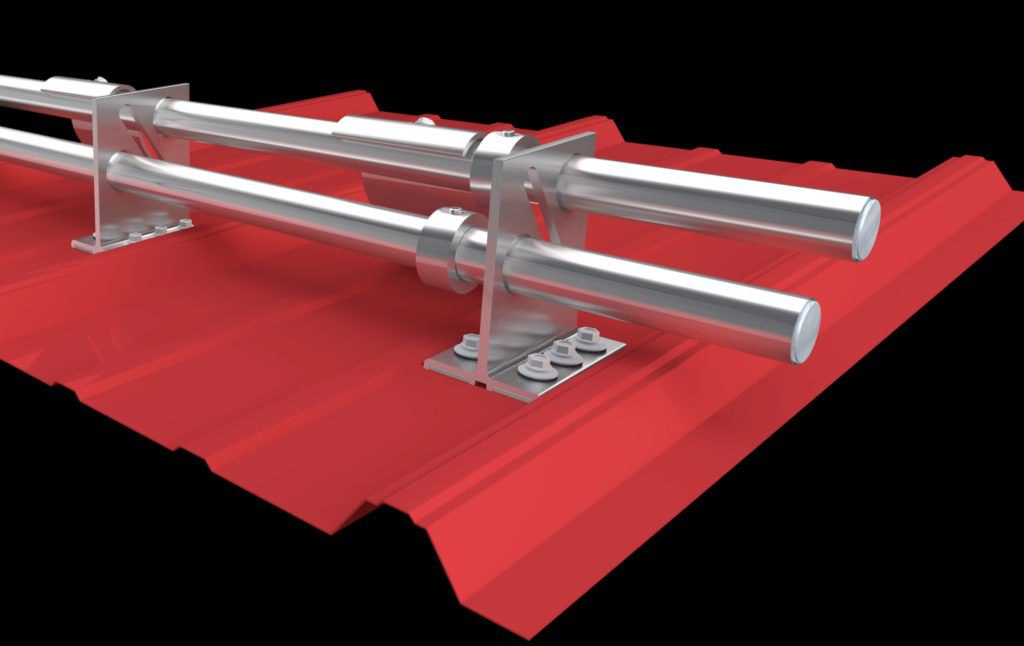
VersaGard™ is compatible with almost any trapezoidal, exposed‑fastened profile. No messy sealants to apply! No chance for leaks! VersaGard comes with factory‑applied butyl sealant already in the base, and the S‑5!®‑ reservoir conceals the sealant from UV exposure, preventing drying and cracks.
Installation is simple! VersaGard is mounted in the flat of the panel, directly into the supporting structure of the roof, i.e. wood decking, wood or steel purlins, or trusses. No surface preparation is necessary; simply wipe away excess oil and debris, peel the release paper from the base, align, and apply. Secure through the pre‑punched holes using the appropriate screws for the supporting structure.
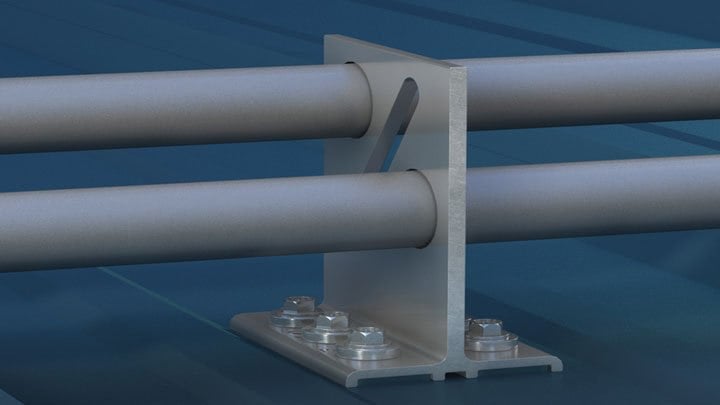
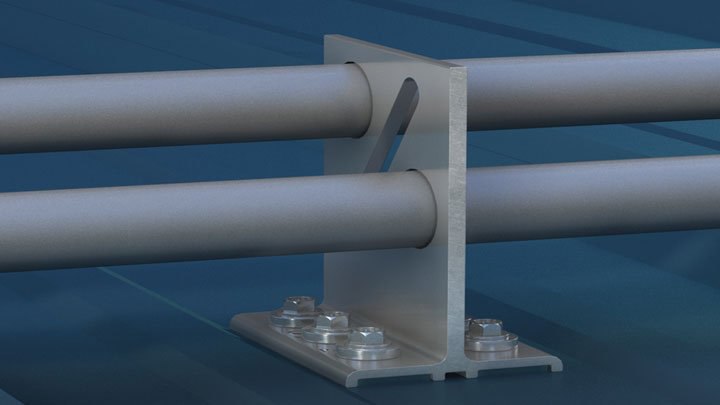
While the circular holes in the vertical part of the bracket support 1″ pipes, the diagonal slot provides flexible support for PV installations via the use of 3/8″, M8 or M10 bolts.
VersaGard can dramatically reduce the risks associated with snow avalanches sliding off of roofs, dumping tons of snow onto anything in its path, at an amazingly affordable price. A VersaGard pipe snow retention system functions without cluttering the lines of the roof and is dramatically stronger than adhesively‑mounted snow guards.
VersaGard can also be used in lieu of an L‑foot to support the installation of photovoltaic panels. VersaGard works with most rail or racking systems, and can be oriented parallel or perpendicular to the roof line.
To accommodate various rib heights and to support one‑ or two‑pipe preferences, VersaGard™ comes with two 1.05″ holes (1″ pipe not included). To support PV installation, the diagonal “slot” provides height flexibility.
VersaGard can be installed parallel (for snow retention or PV installations) or perpendicular to the rib (for PV installations).
Each VersaGard comes with factory‑applied butyl sealant in the base. A structural aluminum attachment bracket, VersaGard is compatible with most common metal roofing materials. For design assistance, ask your distributor. Also, please visit our website for more information including CAD details, metallurgical compatibilities, and specifications.
The VersaGard has been tested for load‑to‑failure results on wood decking, metal, and wood purlins. The independent lab test data found at www.S-5.com can be used for load‑critical designs and applications. S‑5!® holding strength is unmatched in the industry.
VersaGard System Components:
VersaGard
Product packages in boxes of 100 and cases of 100.
DualPipe™
Product packages in boxes of 17 and cases of 714.
DualGard Collar/End Cap Kit
Product packages in boxes of 30 and cases of 30.
DualClip II™
Product packages in boxes of 35 and cases of 140.
DualClip III™
Product packages in boxes of 25 and cases of 100.
Setscrews, flanged bolts and a screwgun bit tip are included in each box.
See our full line-up of clamps for detailed information and pricing.
To help you and your distributor design a DualGard system for your purposes, check out our Web-based calculator.
Note: Do not use VersaGard with attachment spacing greater than 32" (81.3 cm). Custom VersaGard, Splice and SnoClips™ are available for seam spacing greater than 32" (81.3 cm). Please inquire through a distributor.
Before You Start: S-5!® Mini attachment clamps are installed differently depending upon clamp model and seam style. Please see the installation instructions included with your clamps.
It is recommended to pre-load the setscrews into each clamp and DualCollar™ prior to commencing installation. DualGard uses two S-5! Mini clamps at each pipe bracket location. One of these clamps should be fastened to the pipe bracket on what will become the upslope side. Verify which side of the standing seam the setscrews will be applied to, and keep this in mind when bolting them to the pipe brackets. Hand-tighten the M8 bolts attaching the clamps to the DualGard brackets.
Notice: When using S-5-U Mini or S-5-H90 Mini clamps on horizontal seams, clamps cannot be pre-attached to brackets.
Installation Tip: To ensure the brackets line up, it is advisable to use a string line. This is best achieved by measuring up from the eave at each end of the run you are working on. Install a clamp at either end, wrap a string line around each of these clamps and pull it tight. Install the remaining clamps along this string line and your brackets will align with one another.
This row of clamps will support the downslope end of the DualGard bracket. Using the string line method outlined above to align the clamps, tighten each setscrew to the appropriate recommended torque specification. Set aside the M8 bolts provided with the clamps for use later. If utilizing S-5-U Mini or S-5-H90 Mini for horizontal seams, install the upslope clamps now.
Slide the correct number of DualGard brackets onto the 8-foot pipes. Trim either one of the first two pipes so that the connection points between pipes do not align. On the first pipe and bracket assembly, a DualCollar should be fastened onto the top and bottom pipes no more than 7″ from the ends of the pipes, with the first DualGard bracket and clamp placed just outside of the collars. The maximum allowable cantilever for DualPipe™ is 6 inches; setting the DualCollars at 7″ allows for a 1″ gap between the collars and the first DualGard bracket to provide relief for thermal movement. On the last pipe and bracket assembly, a DualCollar should be slid onto the top and bottom pipes just inside of the last bracket and left loose at this point.
Place the pre-assembled section of pipe and brackets on the roof, aligning each bracket with the clamps installed in step 2. Bolt the pipe bracket to the downslope clamp using the provided M8 bolts and a 1⁄2″ (13 mm) wrench or socket to the recommended torque specification of 156 inch-pounds (13 foot pounds). Tighten the setscrew on the upslope clamp, then tighten the bolt.
At the end of each section of pipe where it meets an adjoining section it will be necessary to install a pipe splice. Splices come inserted in the end of the 1″ pipe supplied by S-5! distributors. As each section of pipe is laid down, use the splice to connect the pipes creating an unbroken run of pipe. Splices should be staggered so that the connections on the top pipes do not align with the connections on the bottom pipes. Trim the first top pipe of the assembly so that the splice falls between a different set of DualGard brackets than the bottom pipe splice.
NOTE: S-5! splices are designed with a dimple at center to provide relief for thermal expansion.
Repeat steps 3, 4, and 5 until assembly is complete. As mentioned in step 3, the last pipe assembly should have collars placed just inside of the last bracket of the run. Once the last pipe and bracket assembly is in place, tighten the setscrews on the two collars. Be sure to leave 1″ of space between the collars and the bracket at both ends of the assembly to allow for thermal movement. DualGard assemblies should not exceed 100′ in length. If a longer run is necessary, finish the assembly at or before 100′ and begin a new assembly. At this point it may be necessary to trim the pipe so that it does not extend more than 6″ past the final bracket in the run. This is best achieved using a reciprocating or circular saw with a fine-tooth carbide tip blade. Finish the run by installing the end caps.
Don’t forget DualClips™!
The use of DualClips is recommended with the DualGard system. DualClip II™ and DualClip III™ are optional components that can be added to your S-5! DualGard™ snow retention system to further retard the migration of snow. DualClip II fits seams heights from 1″ to 1.5″. DualClip III fits seams 1-3/4″ to 3-1/4″. When seam spacing is ≤ 24″, one DualClip is used between each seam on the first row of snow retention. When seam spacing is >24″, two clips should be used.
S-5!® has the best snow retention system attachment solutions in the industry for exposed fastened roofs. Our extensive line of versatile and affordable brackets fit every shape and size of virtually every exposed fastened and corrugated roof on the market. S-5! brackets have been extensively tested for load-to-failure results and water tightness, and come with an industry-leading 25-year manufacturers warranty.
Compatible with almost any trapezoidal, exposed-fastened profile, our VersaGard™ bracket is the perfect attachment solution for dual pipe systems. VersaGard bracket features six points of attachment, and the S-5!- reservoir conceals the factory-applied butyl sealant from UV exposure, preventing drying and cracks.
ColorGard is the only snow retention system good enough to be warranted for the life of the roof. Unlike other snow guards that yellow and fail over time, ColorGard’s unsurpassed holding strength controls snow migration with a perfect color-match that lasts the life of the roof.
X-Gard 1.0 is our two-pipe system spanning up to 48″ seams. Like our one-pipe system, X-Gard has greater holding strength, better aesthetics, and longer service life than any other engineered pipe system on the market.
X-Gard 2.0 is our two-pipe system spanning up to 48″ seams. Like our one-pipe system, X-Gard has greater holding strength, better aesthetics, and longer service life than any other engineered pipe system on the market.
Our SnoRail utilizes one Sno-Rod™ positioned just above the panel seams for maximum strength and minimal clutter.
S-5!’s SnoFence uses a SnoPost™ to accommodate a second SnoRod™ two inches above the first. Both SnoRail and SnoFence systems are available in brass for use on copper batten or standing seam roofs and in aluminum for other standing seam roofing materials.
DualGard™ is the most versatile and reliable 1-inch, two-pipe snow retention system on the market for all standing seam roof applications. DualGard utilizes two patented S-5! mini clamps for extra strength versus other two-pipe systems. All DualGard components can be used with VersaGard™ and VersaGard™ V, offering a complete snow retention system for exposed fasten roofs.
VersaGard is compatible with almost any trapezoidal, exposed-fastened profile. No messy sealants to apply! No chance for leaks! VersaGard comes with factory-applied butyl sealant already in the base, and the S-5! patented reservoir conceals the sealant from UV exposure, preventing drying and cracks.
It's a great resource for contractors, architects, and homeowners.
Easy to navigate learning center with videos and blogs that will answer your questions.
Choose Different Textures, Colors, Finishes, and Panel Types On Your Home Before You Decide.